

A graphical package to monitor seti
activity that may be running on multiple computers over a network or multiple
instances on the same computer. It is the first program to monitor multiple PC's without
having to cross mount file systems.
Currently runs on Windows
, Linux, and Mac OSX will be available soon.
You can see BOINCmon screenshots here
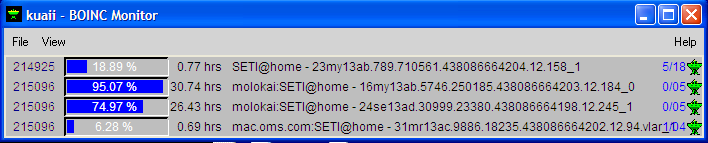
This is the main window of BOINCmon.
The Main Window shows all the computers or directories status at a glance.
Different Colors will indicate if the program is making progress or is currently running.
The Bars indicate the progress of each of the
computers or directories that BOINC is running in.
The number to the left indicate the users completed work units.
Download Latest 3.12
Windows Installation Instructions.
Unzip
the file that you downloaded and place the boincmon.exe file into the directory
that is running seti@home.
Using
the Explorer Double Click on boincmon.exe program
Linux/Unix Installation Instructions.
Download
the boincmon-perl-source. This requires Tk 8.0 or later installed on your
system (I used Tk800.022 from CPAN).
you can install perk Tk with the command
perl -MCPAN -e 'install Tk'
Or just grab one of the compiled versions of boincmon-i386-libx.
These were compiled using perl2exe from
IndigoSTAR
To
install the tarball execute the following:
Place
the boincmon file somewhere in your PATH then if you are running the program
for the first time cd to the directory where BOINC resides and type
boincmon.pl (or boincmon). It will then configure itself to monitor the
current working directory. If you have already configured BOINCmon you
can then execute the command from any directory. It saves its current configuration
in $HOME/.boincmon.
How to Configure - Both Windows and Linux:
Use
pulldown
File->
Properties:
Add
Directory:
Use the
Add Directory Button to add additional BOINC directories.
You will
be prompted to select the user_info.sah file. This will ensure
that you have selected a directory that BOINC resides.
The list is a comma separated list of directories to monitor
ex: C:\Program
Files\seti@home\1,I:\Program Files\seti@home\2,D:\seti\3
the disks
could be local or remotely mounted.
IP-Addrs:
You can
monitor seti progress on other computers by adding a comma
separated list of IP address of computers you wish to monitor.
ex: 192.168.0.100,kauai
Note:
if you use names the program will do a name lookup once to find it's IP
address then share information with that computer. If the IP address changes
on that computer you can do a View -> Refresh to do another name lookup.
Port:
The default
Port # is 1119. You can change this port or socket # but all
computers you wish to communicate with will have to be configured
the same. Changing the Port can serve two purposes.
The first is privacy. You only want to communicate with PCs that know
the port #.
The second is you may want to communicate with different
types of users or machines and do not want to share all the same directories
with every machine. So you can bring up multiple instances of boincmon using
different ports. In order to bring up multiple BOINCmon's you need to make
different instances of the ini file.
DOS users just copy boincmon.exe
to a different directory running this instance will create a new boincmon.ini
file.
Linux users can use the -i option to create and specify a different
ini file other than the default $HOME/.boincmon.
Size:
You can
adjust the size of the boincmon by either increasing or decreasing
the number on the size line.
Hide Menu Bar:
Selected will hide the menu bar Unselected will show the menu bar
Default: Unselected
To get the Menu Bar back once it is hidden Double Click on any Progress Bar
on your screen
Beep if a new client joins the group.
Default Sound Off:
If do not want to cross connect every PC to one another you can designate one
PC as the relay server:
Select for Time format that you wish to display in the Main window.
Seti Details:
Clicking
on the work unit number or directory will display user statistics
and work unit progress details.
Seti SkyMap
Right Click on the work unit number or directory will display the position of
the work unit in the SkyMap
What do the Colors Mean?
Green:
Red:
Yellow:
1) If
you do not hear any updates from a remote computer for 15 minutes.
(Likely they shut of there modem..)
2) If
accompanied by a N/A in the Results field. This means the directory you
This will most likely occur the first time you use boincmon because you did
not
Thanks
to my Big-Bro George for putting this web page together and being my system
tester. Putting up with some pretty ugly builds..
Hello
From Uncle Bob's Cabin!!
I
would like to here your Comment/Questions Send mail to Jeff Omick:
jomick@users.sourceforge.net
Download here: BOINCmon for Windows
If you have multiple PCs BOINCmon is great for Monitoring SETI@Home or BOINC
activity for a single client while saving space on your desktop.
Rather than slowing down your cpu with fancy displays. BOINCmon displays only
the necessary facts at a glance. This is especially helpful if you are
monitoring multiple computers that may be running SETI@Home or BOINC. The main window
will give you a quick look at the progress each of your systems are making.
If you wish to see more information just left click on the desired PC name
or directory and a detailed
work unit screen will appear. A right click will show the position of
that work unit in the SkyMap.
Main Window:

ex: c:\Program
Files\seti@home
The program
will come up default which is monitoring the current directory.
gunzip
-c boincmon-perl-source-1-21.tar.gz | tar xvf -
Sound:
Relay Server:
Default: disabled.
ex: Simple Scenario
You have 4 PC's A, B, C, D
you can make A your relay server then you only have to point B,C,D to A
and All PC's will be able to see each other because A will relay all
information it receives to all other PC's.
This pointing is accomplished via adding A's IP address into B,C,D's
properties Menu.
By Adding A's IP address to B's Properties menu it makes a connection
between B and C. Note: Connections between relay servers should
be made in a hierarchical method see Multi-Relay Server example below.
Ex: Multiple Relay Server Scenario
You have 9 PC 3 in different areas (maybe behind firewalls etc.)
(A1,A2,A3,B1,B2,B3,C1,C2,C3) A1, B1 and C1 you make relay servers.
Create ONLY 1 connection between A1 and B1 and 1 connection between B1 and C1.
This will create a hierarchy making B1 the central (or backbone) relay server.
Do not create a circuit between A1 and C1. This will create a loop.
While there is some protection from loops ie. only 3 hops loops will
add unnecessary traffic over the network and depending on the amount of
pc's being monitored could be substantial.
You then can point the remaining PC's to their respective relay server.
A2,A3 -> A1
B2,B3 -> B1
C2,C3 -> C1
All PC should be able to see everyone's work units.
Show Time in:
Current Time ##.## hrs ex: 8.50 hrs (default)
Current Time HH:MM:SS c ex: 8:30:02 c
Remaining Time HH:MM:SS r ex: 4:20:23 r
(Version 1.20 or greater).
-----
This
condition is good. BOINC is working and has updated your results.sah
file
within
the last 5 minutes.
----
If BOINC
did not update the results.sah file within a 5 minute period.
The status
will turn red for that monitored directory.
-------
A yellow
condition can occur for 2 reasons.
After
30 minutes of no response the remote will be erased from
the main
screen.. The Computer will then re-appear when
activity
starts again.
are monitoring
does not contain BOINC files needed. ex: "user_info.sah" file.
place
it in the BOINC directory or did not run it from the BOINC directory.
To correct
clear out the directory that occupies the list by highlighting the
directory
by hitting the backspace. Then use the Add directory button to select
the correct
directory for monitoring.
Since I do not have a Sun or IBM machine for testing please supply your feedback
jomick@users.sourceforge.net
- Or -
![]()
![]()